

Rocky Road Brownies
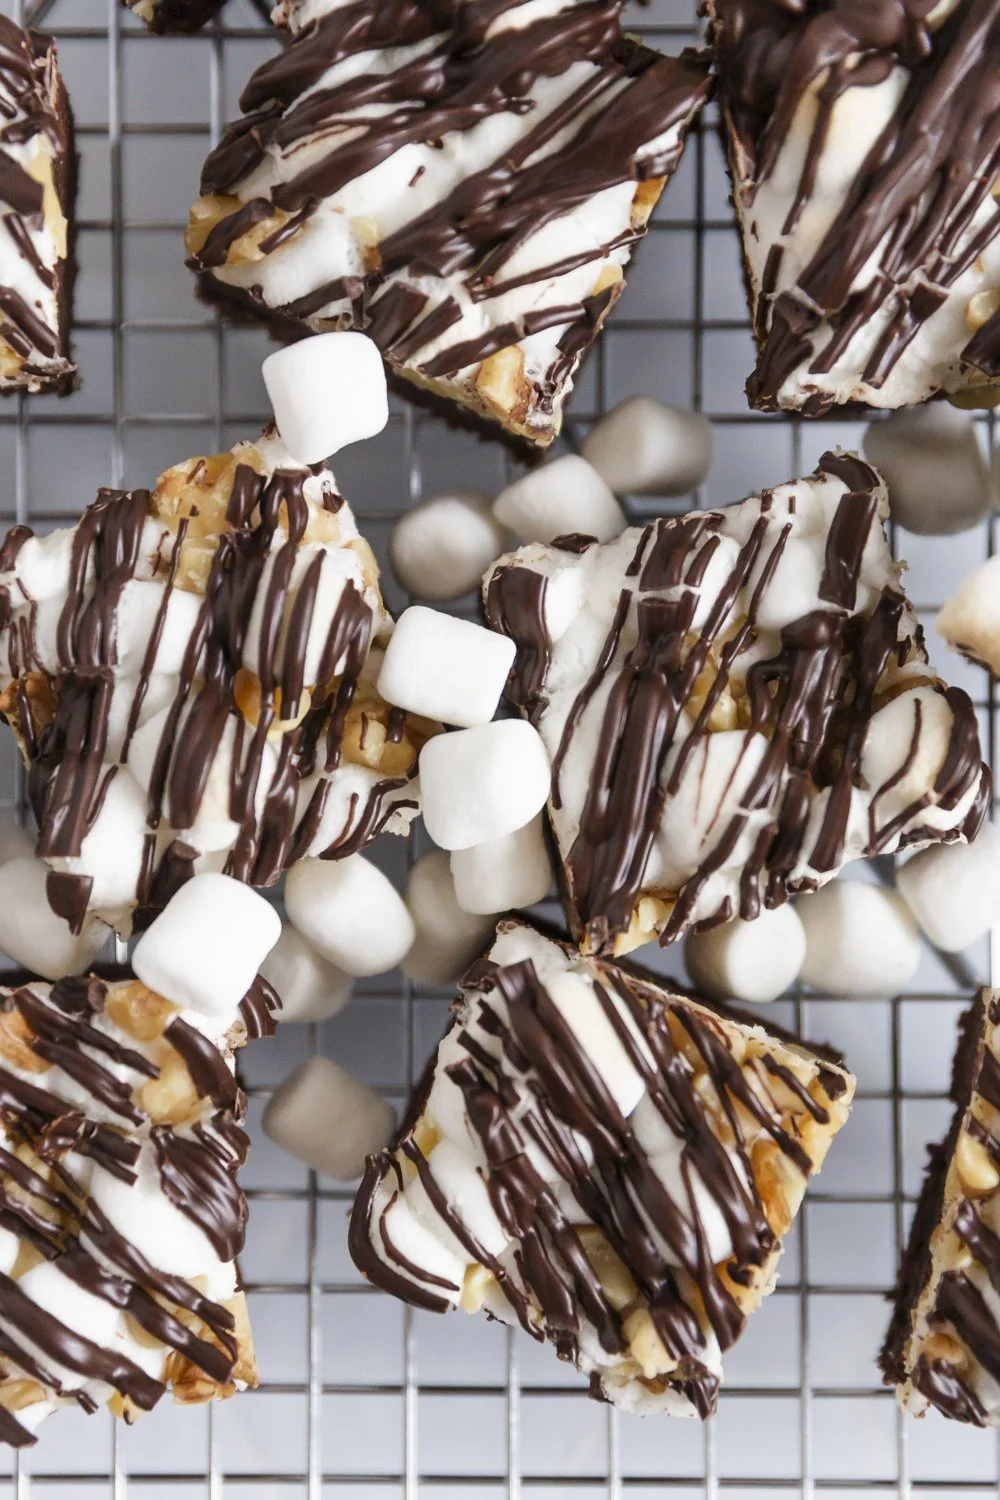
These rocky road brownies are irresistible—fluffy, sweet marshmallows and a sprinkle of walnuts sit atop a rich, fudgy brownie base, all drizzled with a creamy chocolate glaze. This treat is indulgent, chocolatey, and bursting with flavor!
*This post may contain affiliate links.


Why you’ll love rocky road brownies
Rocky Road is a candy treat that reminds me of the nostalgic atmosphere of vintage candy shops, like Marini’s in Santa Cruz where I worked when I was younger. If you're craving something sweet and nostalgic, this is the go-to recipe!
The texture is amazing— the light, fluffy marshmallow topping, the crunch of walnuts, and the gooey, dense brownies create a flavor combination that's truly unforgettable!
These bars have a big payoff for the minimal amount of work involved - easy on the eyes and hard to resist! I almost didn’t want to share the batch I made…
Recipe Tips for the best rocky road brownies
Sift the cocoa powder for an easier time mixing it in and a smoother batter.
Careful not to over bake them. The key to a soft and chewy bar is to pull them out of the oven as soon as they puff up in the center and turn light golden brown around the edges. I can be difficult to tell when a brownie is done because they are already dark in color. If you insert a toothpick into the center and it comes out relatively clear, and the top appears to be crusted, they are done. It makes a HUGE difference in the texture of your bar, and I think it also makes them last a little longer too!

Tips for baking with marshmallows
Freeze the marshmallows! This is the absolute most important tip for baking with marshmallows. Leave them in the freezer for at least two hours to harden. This will help them bake slower so they don’t burn and melt.
If you leave the dish in the oven a little bit too long, the marshmallows will burn and turn translucent, so make sure you remove the pan when the timer goes off, or at least watch it very carefully near the end of the bake. The marshmallows should still look bright white with just a light golden on top when you remove the pan from the oven.
FAQ
-
In short, adding less flour to the fat and sugar ratio. Where a cake recipe might call for over two cups of flour and a half cup of butter to make the cake fluffy and airy, brownies call for 1 cup of flour and ½ cup of butter to make the brownie dense and chewy.
-
Brownies are very similar to blondies except there is no cocoa powder added to blondies, where that is the main flavor ingredient in brownies.
-
Absolutely! Just place (fully baked and cooled) in an air tight freezer container and store in the freezer for up to three months. Remove from the freezer and place in the refrigerator 24 hours prior to serving.
-
Yes, you can reduce the sugar to about 25% (so instead of adding 1 cup to this recipe, you will add ¾ cup) without affecting the texture. If you are looking to significantly reduce the sugar, I would recommend trying a cookie bar recipe instead, which I have developed to accommodate a lower amount of sugar.
Check these out:


Helpful Kitchen Tools
8 x 8 inch baking dish
parchment paper
1 medium size bowl
1 large bowl or an electric stand mixer
spatula
mesh strainer
plastic sandwich bag
Ingredients
Batter
½ cup all purpose flour
3/4 cup unsweetened cocoa powder
1 teaspoon baking powder
1/4 teaspoon baking soda
½ teaspoon salt
1 cup granulated sugar
½ cup unsalted butter, melted
2 large eggs
2 tsp vanilla extract
Topping
1 cup mini marshmallows, frozen
½ chopped walnuts, plus more for topping
½ cup chocolate melting wafers
How to make rocky road brownies
Prep
Freeze your marshmallows for at least two hours.
Melt the butter and allow it to cool slightly
Preheat oven to 350℉.
Line an 8 x 8 baking dish with parchment paper
Mix the dough
Add flour to a large mixing bowl. Sift in cocoa powder with a mesh strainer. Add baking powder, baking soda, and salt and mix until well combined and set aside.
Mix the butter and sugar together. Add the egg and vanilla and mix until well combined, scraping down the sides of the bowl.
Add the flour mixture to the butter mixture and mix until just combined, scraping down the sides of the bowl.
Pour the mixture into the parchment lined pan and spread it evenly to each corner.
Bake for 20 - 25 minutes, or until the middle puffs up slightly and they look done or almost done.
Add the topping
Remove the pan from the oven and sprinkle the walnuts and frozen marshmallows evenly over the top of the brownies.
Bake for 5 more minutes, or until marshmallows become melty but some are still maintaining their shape. They will also turn lightly golden brown on the tops. Remove promptly once this happens as they can burn easily.
Let sit until completely cooled (at least 1 hour), do not remove from the pan just yet.
Once the bars are completely cooled, melt the chocolate wafers in the microwave in 20 second intervals, stirring between each until fully melted.
Add the melted chocolate to a plastic sandwich bag and squeeze it down to one corner. Cut off the tip of the corner and drizzle the chocolate onto the bars. Keep in mind the larger the hole, the larger the thicker the drizzle will look.
Let the chocolate set until completely cooled (it works best to put them in the fridge for about two hours), then loosen the edges and remove the bars from the pan, slice, and serve!
How to Store
Store rocky road brownies at room temperature in an air tight container for up to two days, or store in the refrigerator for up to five days. If stored in the refrigerator, let stand at room temperature for 30 minutes, or pop in the microwave for five to ten seconds to warm to room temperature.
You can also freeze rocky road brownies easily. Just place (fully baked and cooled) in an air tight freezer container and store in the freezer for up to three months. Remove from the freezer and place in the refrigerator 24 hours prior to serving.


Rocky Road Brownies
These rocky road brownies are irresistible—fluffy, sweet marshmallows and a sprinkle of walnuts sit atop a rich, fudgy brownie base, all drizzled with a creamy chocolate glaze. This treat is indulgent, chocolatey, and bursting with flavor!
Ingredients
Directions
- Prep: Freeze your marshmallows for at least two hours. Melt the butter and allow it to cool slightly Preheat oven to 350℉. Line an 8 x 8 baking dish with parchment paper
- Mix the dough: Add flour to a large mixing bowl. Sift in cocoa powder with a mesh strainer. Add baking powder, baking soda, and salt and mix until well combined and set aside. Mix the butter and sugar together. Add the egg and vanilla and mix until well combined, scraping down the sides of the bowl. Add the flour mixture to the butter mixture and mix until just combined, scraping down the sides of the bowl. Pour the mixture into the parchment lined pan and spread it evenly to each corner. Bake for 20 - 25 minutes, or until the middle puffs up slightly and they look done or almost done.
- Add the topping: Remove the pan from the oven and sprinkle the walnuts and frozen marshmallows evenly over the top of the brownies. Bake for 5 more minutes, or until marshmallows become melty but some are still maintaining their shape. They will also turn lightly golden brown on the tops. Remove promptly once this happens as they can burn easily. Let sit until completely cooled (at least 1 hour), do not remove from the pan just yet.
- Once the bars are completely cooled, melt the chocolate wafers in the microwave in 20 second intervals, stirring between each until fully melted. Add the melted chocolate to a plastic sandwich bag and squeeze it down to one corner. Cut off the tip of the corner and drizzle the chocolate onto the bars. Keep in mind the larger the hole, the larger the thicker the drizzle will look. Let the chocolate set until completely cooled (it works best to put them in the fridge for about two hours), then loosen the edges and remove the bars from the pan, slice, and serve!
Nutrition Facts
Calories
159Fat
8 gSat. Fat
5 gCarbs
22 gFiber
2 gNet carbs
21 gSugar
16 gProtein
2 gSodium
133 mgCholesterol
39 mg*Nutrition is auto-calculated by recipes generator.


